Sunday, June 23, 2013

Coconut Oil

Coconut oil. I'm sure you've heard a lot about it, because I know I have. I haven't used up until now though. I just picked up a jar for nine dollars the other day. This is what I got.


Now you can use coconut oil for cooking, but I bought it for my hair. The first time I used it, I slathered all over my hair (roots to tips) about a half hour to an hour before I took a shower. It took a little work to get it all out (I shampooed two or three times before it came out - I use the hydrating Moroccan Oil shampoo now), but it was absolutely worth it. My hair felt like butter after it dried. The stuff is amazing. You can use it as a lotion too. Also, it works great for lips as well (the kicker - it tastes great, and it's supposed to be pretty healthy for you too). I also use it as a leave-in treatment for my ends between washes. I wash my hair once every two, maybe three days, and if I notice that it feels a little dry between washes, I'll rub a bit of it onto the ends. Don't put too much on though; it's very oily. I also try and put it on a little thicker before every shower as well, though I don't think your hair always needs it from root to tip.

It's great stuff, and I definitely recommend it to anyone who feels like their hair needs a little extra work. It's cheap, and it's natural. I love it!

Monday, August 13, 2012

How to Take the Best Shower

I was showering yesterday and realized that I have a very specific routine when I shower for very specific reasons, so I figured I would share.


First of all, it's best to shampoo and condition your before you use body wash. This helps reduce bacne because then greasy conditioner isn't the last thing to touch your body before you step out of the shower.

Every time I shower, instead of just washing my face, I exfoliate it with a scrub to get rid of dead skin and make it as smooth as possible. Personally, I use Clean & Clear scrubs. They seem to work the best for me.

Now, most women know this already, but I'm here to tell you again. When you shampoo, only shampoo your scalp. Your hair doesn't get greasy except for the roots, so you don't need to dehydrate the rest of it! If there's any sort of product in your hair, it will get washed out when you rinse out your shampoo. When you condition, only condition the tail of your would-be-ponytail. If you use conditioner on your scalp, it will only make it greasy. Also, if you don't have a deep conditioner and would like a little more moisture, just leave your regular conditioner in for a few minutes (about three works). The heat in the shower really helps set it in.

As far as shaving goes, don't do it first! Soaking a bit in the shower helps you get a better shave. Don't wait too long though, any more than about ten minutes will cause your skin to swell. This won't allow you to get a close shave. Also, light exfoliating on the areas you shave is beneficial. Areas like your underarms and bikini line are more prone to ingrown hairs. Using something like a washcloth or loofah help to get rid of the dead skin that causes this. Also, if you get razor burn on your bikini line, use cream (such as Bikini Zone) specifically for razor burn on your bikini line or Neosporin to calm it.

One last tip. Make sure when you're using body wash not to get it in your hair. This sucks all of the moisture out of it.

Sunday, August 5, 2012

Lip Tricks

Want lips as kissable as these?


Here are the best tips and tricks I know!

I think this is the most important thing you can do for your lips: drink water! No one wants to kiss dry, cracked lips. Women should generally drink about 60 ounces of water a day, but this is different for everyone. 

Now, if you do have dead skin on your lips, the best thing to do is exfoliate. Yes, you can buy lip exfoliaters. You can also use things from home to exfoliate. I've heard people use their vibrating tooth brushes every time they brush their teeth. Some people just use a warm, damp wash cloth and rub it over their lips. I like to use a heavy dose of chap stick and a disposable mascara wand to wipe off the dead skin. Some women keep the wands from old mascaras to use for this sort of thing. Just make sure not to rub to the point of pain!

If you wear any sort of lip color, the best thing to do is dab a little bit of a shimmer on the center of your bottom lip. This has the same effect as highlighting on your face; it highlights your lips and makes them appear more full. 

For those of you who use lip liner - draw only on your lips! I've seen women try to line outside the lines of their lips in order to make them appear larger. While this thought is appealing, it's not realistic. It is noticeable. 

Saturday, August 4, 2012

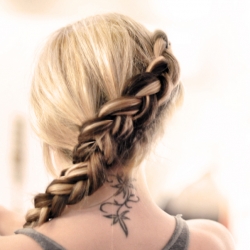
How to Fake a Thick Braid

Wish you had a nice thick braid like this?


Well, me too. But there's good news! Here's how to fake it.

First, master the "inside out french braid". This is done the exact same way as a normal french braid, but instead of placing pieces over each other, place each piece under the next (i.e. of the three strands, right piece goes under the middle piece to become the new middle piece, then left piece goes under new middle piece to become the new new middle piece, etc.). This causes the braid to look like the one pictured above. Now, to make it look fuller. This is actually the easy part. All you have to do is pinch the outside of each little section of the braid. Now, just pull! That's all you have to do. It won't look perfect; don't afraid to be messy! This is sort of what it should look like.


See how the sections bubble out a bit? That's what you're going for. It creates the illusion of thicker hair. This technique can also be used on thick hair for a messy look. Hope this helps!

Wednesday, August 1, 2012

Natural Smokey Eye

This is my favorite look to do because it's simple and looks great. It's sort of a natural smoky eye. Here's the finishing look!


 1. First, start off using an eye shadow primer. I used to use a liquid primer by Urban Decay, but switched to a cream by MAC because Urban's was a bit stickier, so it made it harder to blend shadows. To apply the primer, I use a concealer brush. Make sure to apply the primer all over your lids, up to your brows, underneath your eyes, and on both corners of your eyes. Don't extend the primer past where you'll be putting eye shadow though, as it does have a nude coloring to it, and feels sticky without shadow on it.


2. Next, pick a champagne colored high lighter. I use Virgin by Urban Decay which is in the Naked palette. To apply it, I use the brush that comes in the palette (similar to a concealer brush with a more plastic feel to the bristles). Apply this to both your brow bone and the inner corner of your eyes. Extend the shade into the area your base eye shadow will go for better blending.


3. Next, add eye liner on both your top and bottom lids. I use Urban Decay's 24/7 eyeliner in Perversion. I like Urban's because it stays on well and is relatively easy to smudge. I like to apply my liner thickly, but that's up to you. Also, mine wings out a bit on the outer corners because I'm partial to the cat eye effect, but the shape of your liner is also up to you. This doesn't have to be perfect because you'll be layer shadow over it.


4. Now pick a shade to use as your base. I would go with a light, matte brown. I use Naked, which is also by Urban Decay and in the Naked palette. I use Smashbox's "Definer Brush" which is #15 and pat the shadow on rather than swipe it on. Yes, you should put the shadow on over your eyeliner. Make sure to pat the shadow on your entire lid all the way up to meet your highlighter. Also make sure to pat it on the inner two thirds of your bottom lid.


5. Now, picker a darker (still matte) brown. I use Buck (also by Urban and in the Naked palette) and the same brush. Put this shade on the outer corners of your eyes (on both lids) and in your crease from the outer corner of your eye to just before the inner. Make sure to blend fully. You don't want there to be a hard line between the darker and lighter browns. Tip: I've heard the placement of this shadow be described as a sideways V, so think of that when applying it.


6. This step is optional. Use a darker brown (I use Hustle which is by Urban and in the Naked Palette) and go over what you just did, but thinner. For this, I use an angled shadow brush. Make sure to blend this thoroughly. I like to wing my shadow out on the outer corners because again, I'm partial to the cat eye look. This is up to you. Also, how low you apply this shade on your lower lid is up to you. I like dramatic eye makeup, so I apply mine low. 


7. Now it's time to reline your eyeliner. I use Shmashbox's "Double-Ended Smudger Brush" which is #20 and the shadow I use Creep (by Urban in the Naked Palette). Just go over your liner with this shadow. Make sure the line is soft. Also, it's important to go over where your upper and lower lids meet on the outer corner of your eye.


8. Now it's time to line your waterlines. Line both your waterlines (top and bottom) with a water proof liner (for staying power). Lining your top waterline (which isn't for everyone as it makes sensitive eyes water profusely) helps the liner on your bottom waterline stay on and also helps line the gap between your top lid and lashes.


9. Time for mascara! For the best ways to apply it, check my earlier post.


10. Lastly, do your eyebrows! For tips and tricks, check my earlier post!


And there's the finished look! Good luck everyone (:

Tuesday, July 24, 2012

Eyebrows

It seems to me that most women don't tend to their eyebrows like they could. Of course most women have them waxed or pluck them themselves, but that's not what I'm referring to. There are a number of ways to change the look of your brows. 


Number one on the list would be waxing and plucking. That one's pretty self-explanatory.

Next would probably be trimming. I don't think this is for everyone, but it's certainly for me. My eyebrow hairs are relatively long and therefore can become unruly. Because of this, I like to keep my brows trimmed. Here's how to do it. Use an eyebrow brush and brush your eyebrows straight up (if it looks really funny, you're doing it right). Now, trim the hair by following the line your natural eyebrow follows and cutting along that line. Personally I use professional hair cutting scissors. Obviously not everyone has those lying around the house. Instead, I'd suggest using a sharp pair that you can be fairly detailed with. Generally you are only supposed to brush the hair up and cut it, but I also brush it down and follow the same process. I'm not sure, but I assume this works for me because I have thick eyebrows. Also, I have an unfortunate cowlick on one of my eyebrows. The inner end of it grows straight up. In order to combat this, I just cut it down to the shape it should be by mirroring my other eyebrow.

You can also pencil in your eyebrows. Yes, this does sound counterproductive, but it creates a stronger (and for those with lightly colored brows), more visible brow. I like to save this look for when I have strong eye make up on, otherwise your eyebrows get sort of lost on your face. Also, you can use powder and a thick, stiff bristled brush to fill them in. A pencil provides a sharper look than powder. I also think powder looks more natural. To fill in your brows, just follow their natural lines. If you're using a pencil, use short strokes in the direction your hair grows. This creates a more natural look as the strokes mock individual hairs.

Last but not least is keeping your brows in place. To do this, you can use either wax or gel. Wax has a little less hold than gel does, but is easier to apply (too much gel gives your brows a wet look). These methods also seem to keep the pigment on from filling in your brows, especially if you used powder. There are even some eyebrow pencils that include wax in them, though this probably has the least staying power of the three methods.

Sunday, July 22, 2012

Foundation

I feel like foundation is often an overlooked step in make up. Of course most girls use it, but I don't think most use it to its full advantage. There are a lot of ways to play with foundation.

The most important aspect to foundation is choosing the proper type for you. There are cream, powder, liquid, and even moose foundations. Personally, I use powder because I have such an oily face. Unfortunately, powder offers the least amount of coverage. Liquid, I would say, provides the most, but does not agree with oily faces like mine (though it does moisturize a drier face). For maximum coverage, some girls apply liquid foundation with a layer of powder on top (beware: making either layer too thick will result in a cakey look). The cream and moose foundations generally provide medium coverage.

As far as an applicator goes, this depends on both the person and type of foundation. Personally, I use a brush for my powder. It is relatively small for a foundation brush (not much bigger than a quarter in diameter) and has compact bristles for a more controlled application. Some people prefer a very big, very fluffy brush for their foundation. For cream, liquid, and moose foundations a make up sponge can be used, but a flat foundation brush (like an over sized concealer brush) generally seems to be a better method. Fingers can also be used, but again, the brush is the way to go (just make sure you clean it often to rid it of the leftover bacteria from your face and to create a more smooth look to your foundation).

Another equally important aspect to foundation is finding your perfect shade. This is a complicated process. The best thing to do is go to a professional make up store (Ulta, Sephore, MAC, Clinique, etc.) and have a store representative do it for you. You have to know what type of undertones your skin has as well as what foundations would match those undertones, and a store representative will be trained in this. Even if you don't buy your foundation from that store, it's a good thing to do. I realize a lot of really high end make up is way out of most people's price range! Just go to your favorite drug store and try to match that shade. If you go home and realize it doesn't match, a lot of stores let you return it. If not, well, just learn from your mistake.

Let's talk about concealer. Just like foundation itself, you have a lot of options. I have actually come across powder concealers (which I haven't tried as I don't understand exactly how it doesn't get swirled around your face with your foundation). The three most popular types of concealer I have seen are liquid, cream, and stick. I have tried all three, though none have worked for me. Usually (from my experience at least) concealer and powder foundation don't mix. After a little of the day's wear and tear, the foundation comes off everywhere except the concealer spots, leaving a very obvious circle. For those of you who can actually wear concealer, let's talk about the different types. All should be used with a concealer brush (this one has relatively soft, very compact bristles and is flat), though both the stick and liquid concealer can be used with just fingers. I think all three types work relatively the same. Here, personal preference seems to be the only deciding factor when choosing a concealer. One tip I have for applying concealer is to cover an area slightly greater than the area you actually want covered. This is so that when you apply your foundation, it does not wipe the edge of your concealer away to reveal whatever you'd like concealed.

Now, on to the fun stuff. Foundation is really only a blank canvas for your face. Contouring and highlighting is the paint. Here are the best places to put your bronzer: temples, under cheekbones, sides of nose, and sides of chin on jawbone. Pinpointing your bronzer adds self-created shadow to your face. Shadow on your temples creates a more stream line look to your face (thinner). Shadow under your cheekbones creates more defined cheekbones. Shadow on the sides of your nose creates a thinner nose. Shadow on the sides of your chin on your jawbone create a more pronounced chin (think Reese Witherspoon, but a little less pronounced than that). 

As far as highlighting goes, hit the middle of your forehead, nose, and chin. These are the spots where the most natural light would hit your face. This gives your face a natural glow. Personally I think highlighter should be a shimmery champagne color, but it's really up to the wearer. It can also replace blush and go on your cheekbones or the apple of your cheeks (the protruding part of your cheeks when you smile). You have to find which spot works best for your face.

One last tip for foundation. Put it on after your eye make up! While most women do this the other way around, saving your foundation for last allows you to correct some of the mistakes you made when applying your eye make up. Things like fall out on your cheekbones or a bit of mascara under your eye.

Aaaaand here's the end look! Well, sometimes...